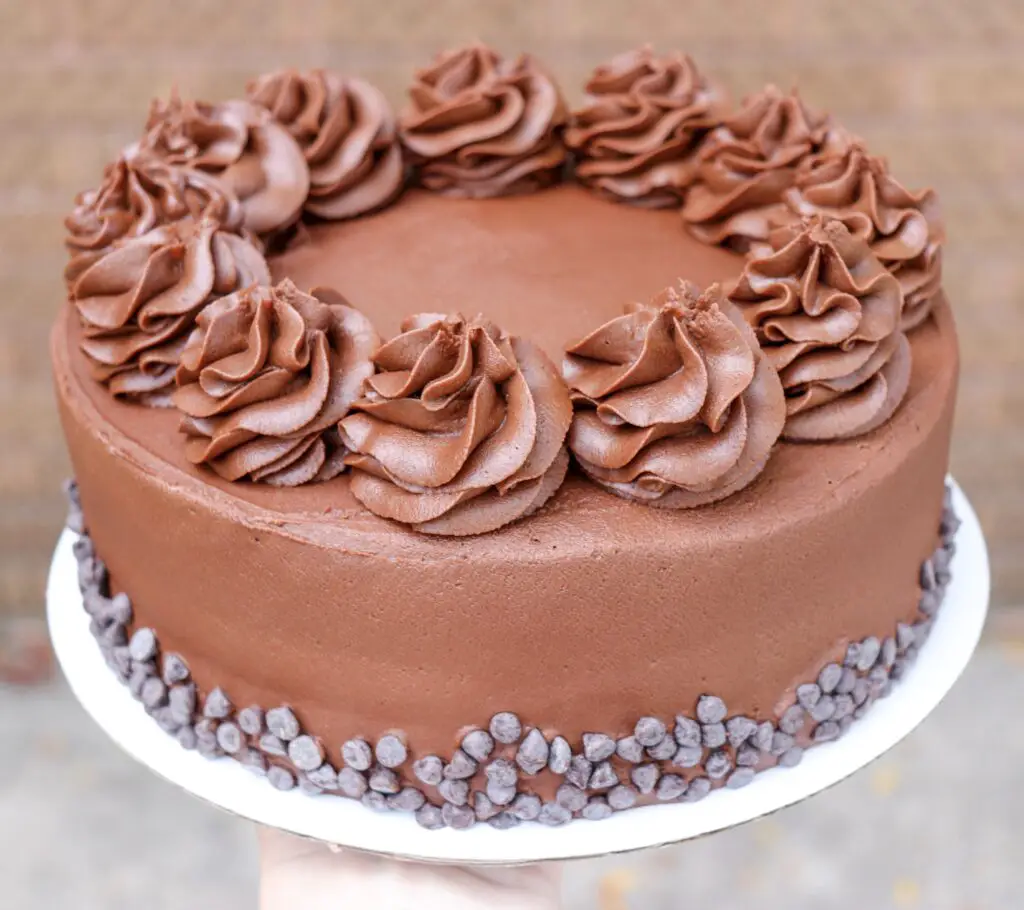
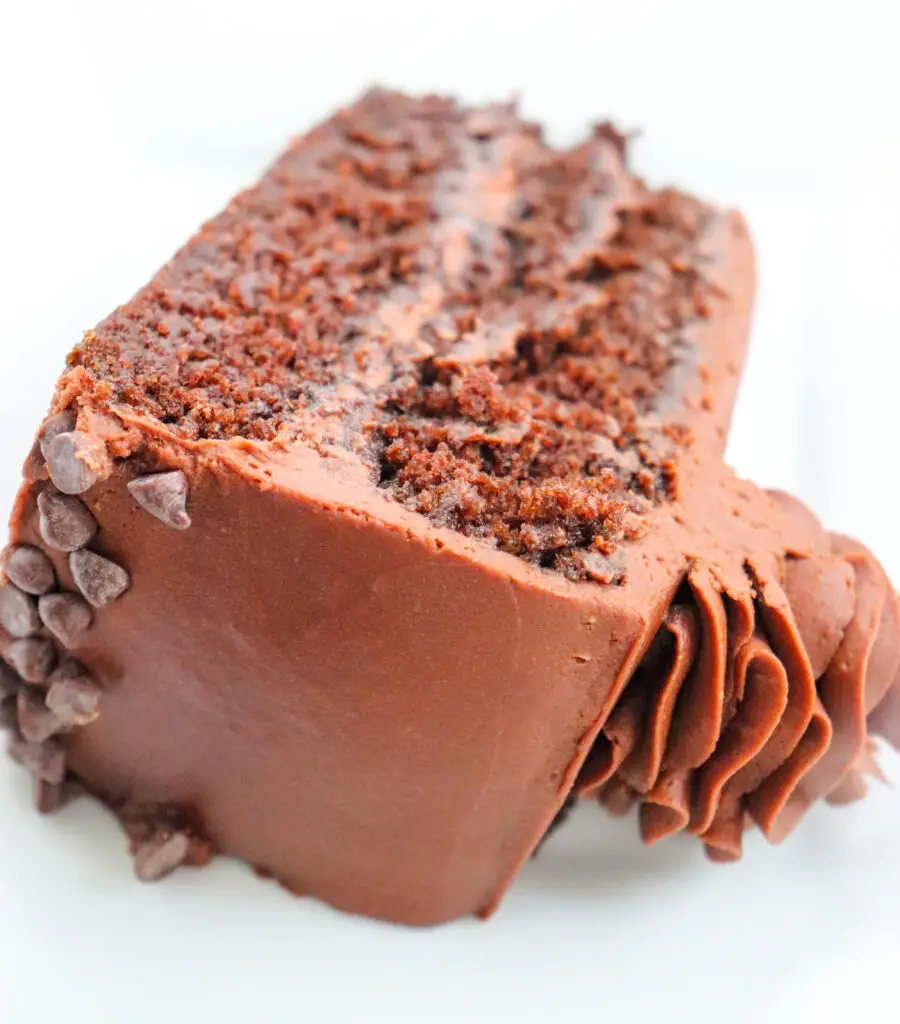
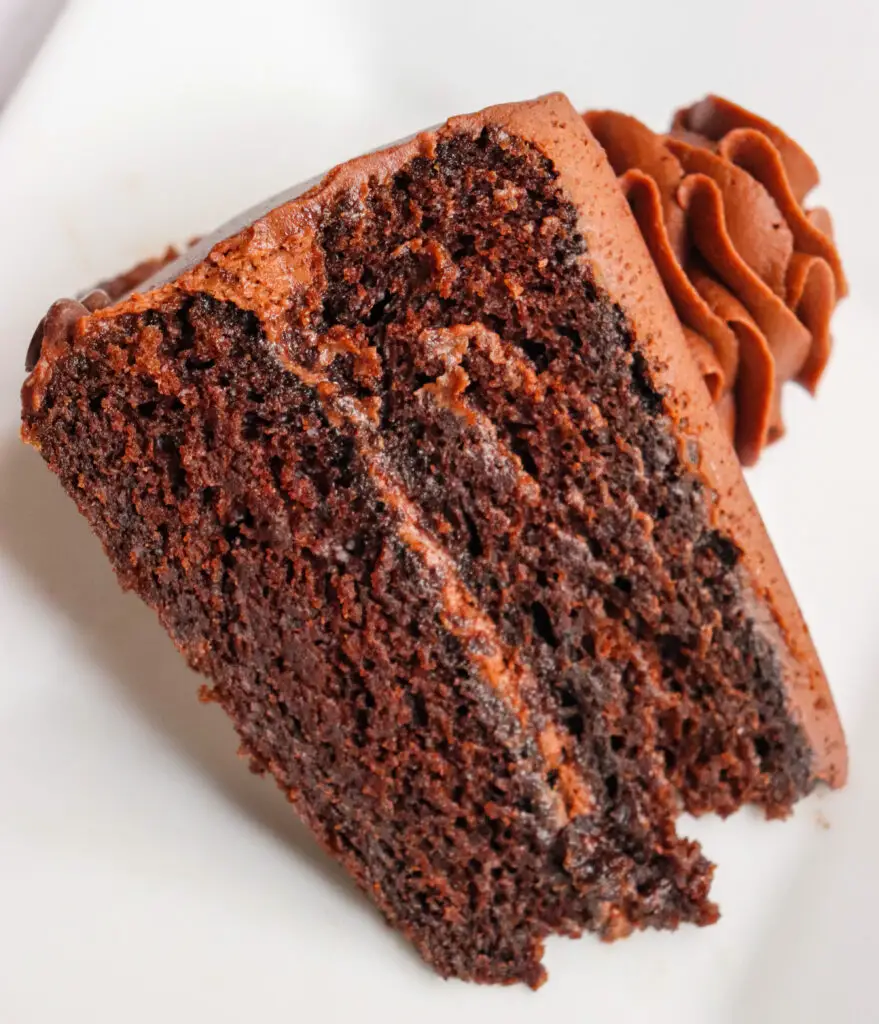
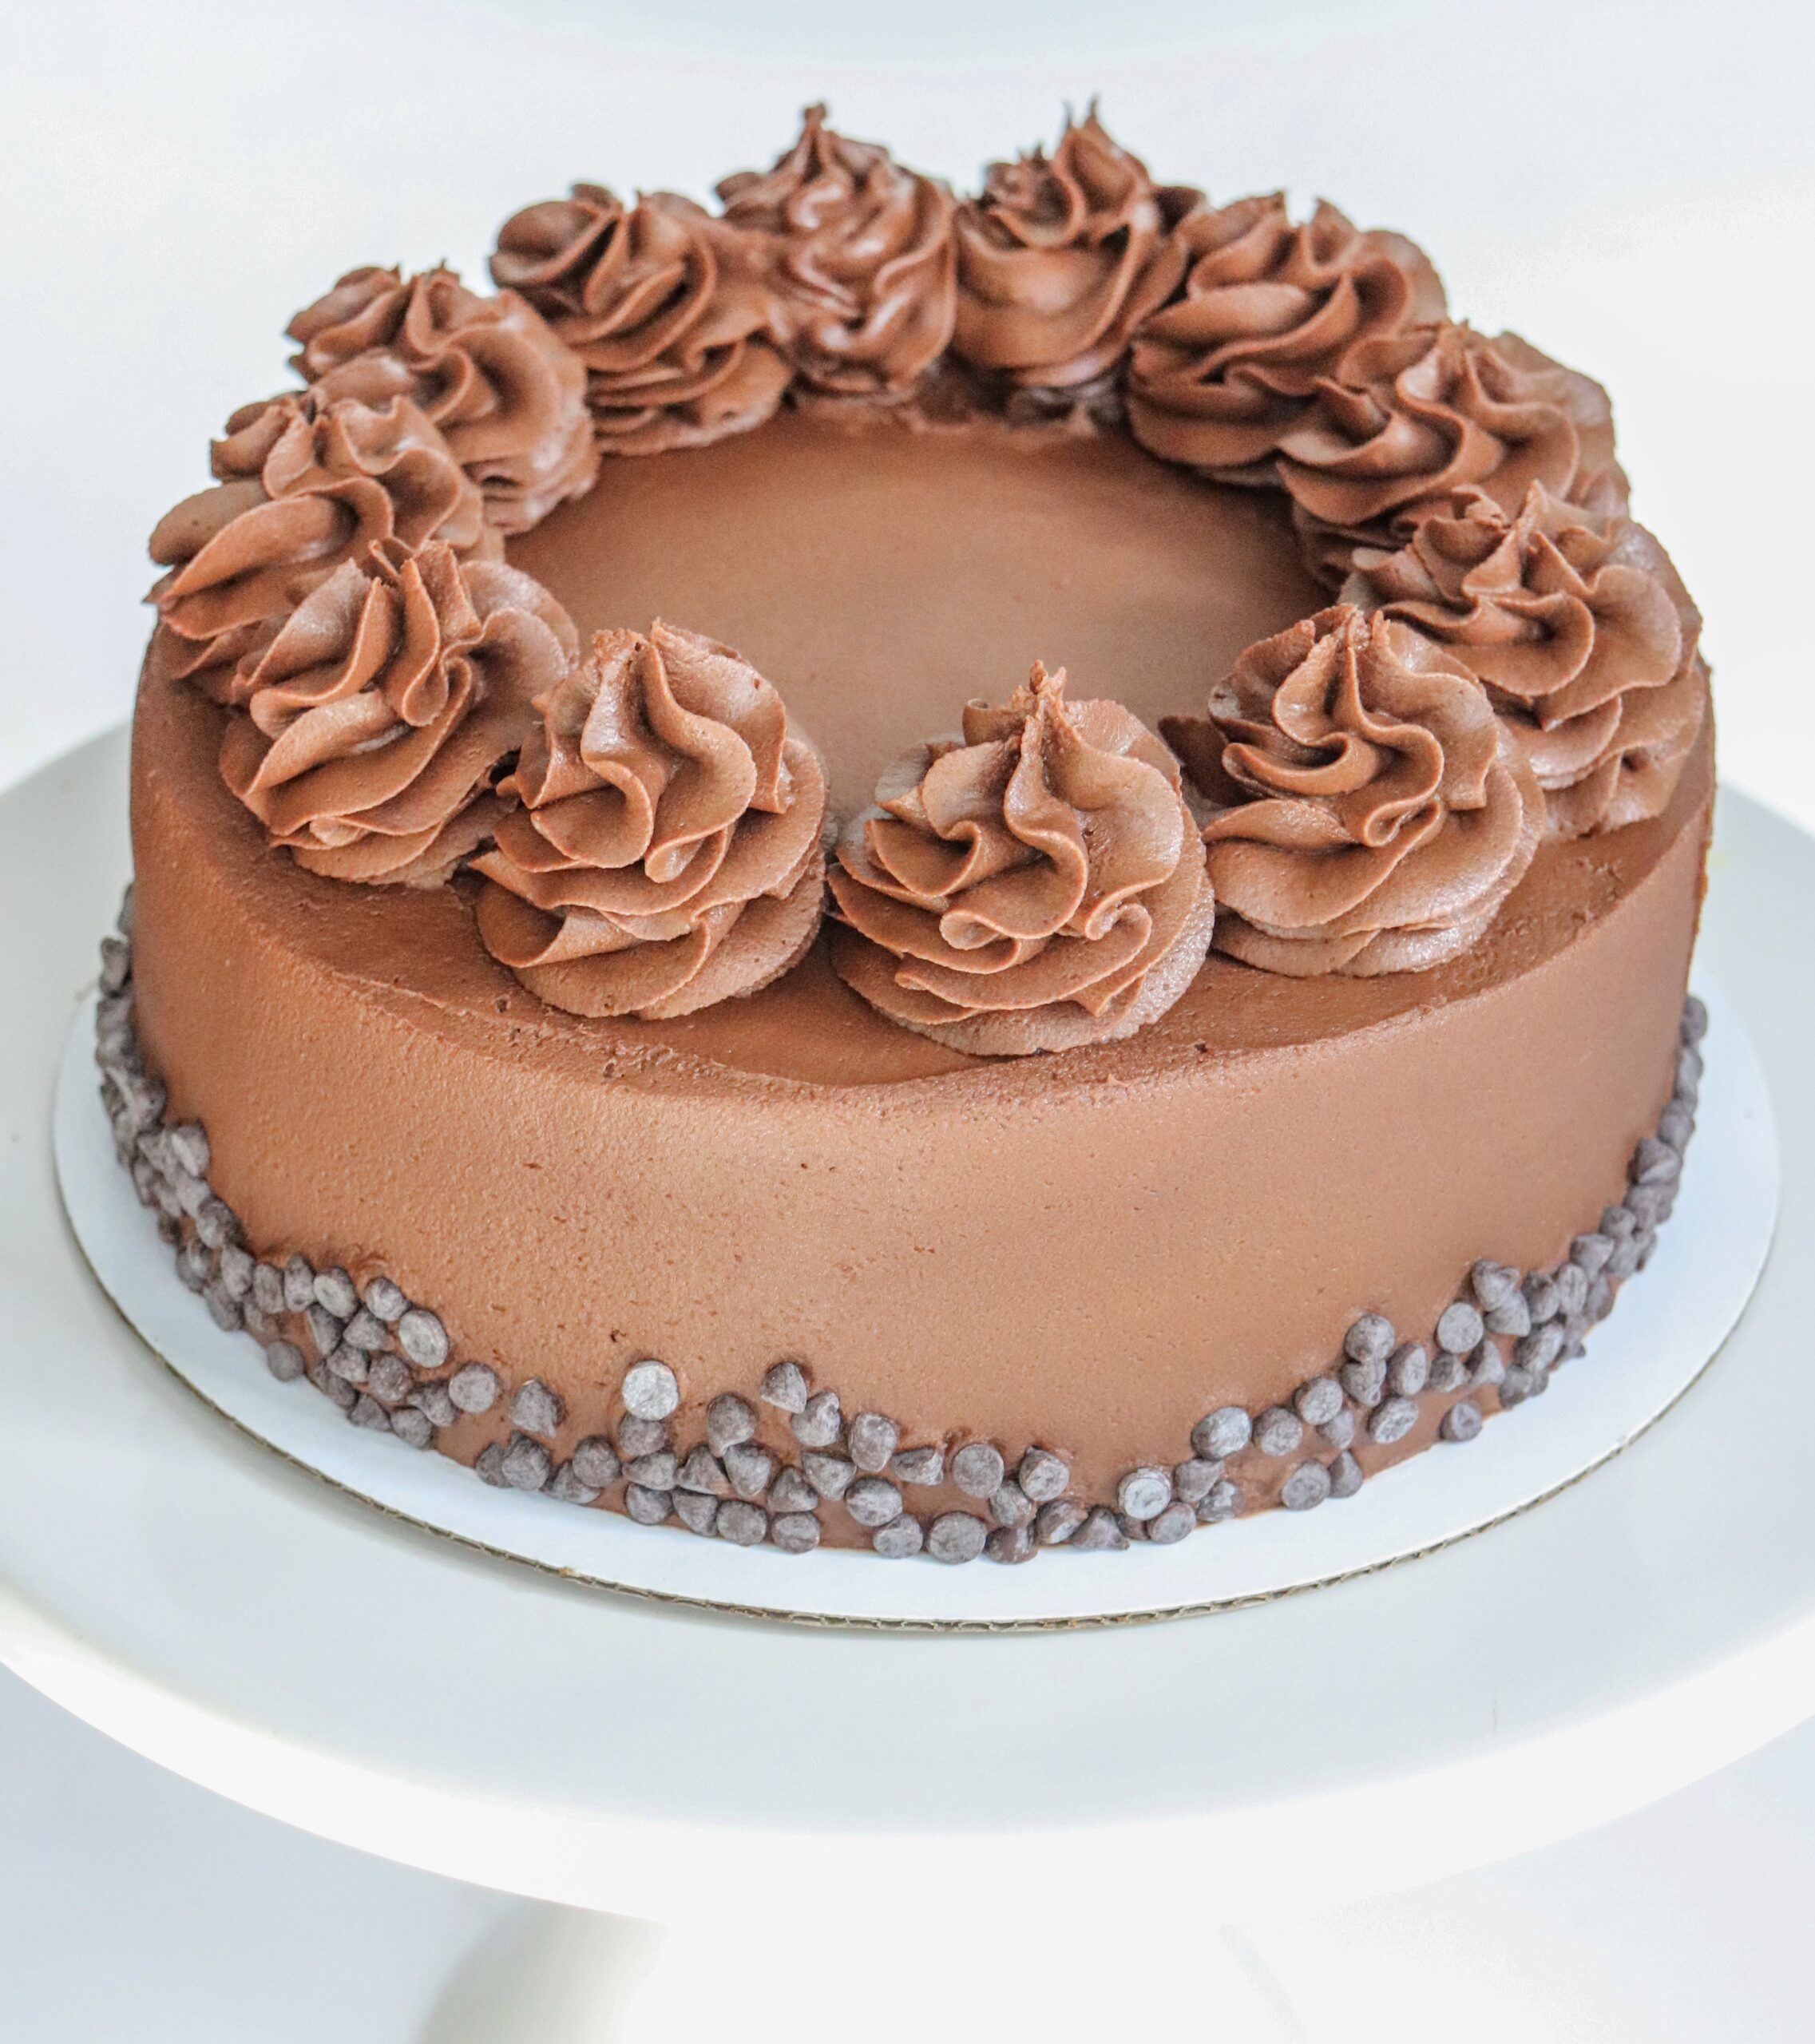
This is called the ultimate fudgy chocolate cake for a reason. The combination of buttermilk, sour cream, and vegetable oil leads to a moist and dense cake while the intense chocolate flavor comes from cocoa powder, espresso powder, and coffee. This cake is paired with a chocolate buttercream that’s made extra smooth and fudgy with the addition of dairy-free chocolate ganache.
Why this cake will be your newest obsession:
- It’s loaded with chocolate
- It’s rich, dense, and fudgy
- Its simple design is super pretty – it’ll wow your guests!
Important ingredients for this Fudgy Chocolate Cake
All-purpose flour: This helps create structure in the cake. Measure your flour using the spoon-and-level method to ensure your cake doesn’t turn out dry.
Baking soda and baking powder: These are the leavening ingredients. They’re extremely important to cause the cake to rise, as there are no eggs in this recipe.
Unsweetened natural cocoa powder: This adds the chocolate flavor to the cake. Opt for unsweetened natural cocoa powder over dutch process.
Espresso powder: This ingredient is optional, however, it intensifies the chocolate flavor in the cake. Your cake won’t taste like coffee, it’ll just be intensely chocolatey!
Soy milk + vinegar or lemon juice: This is your vegan buttermilk. It adds moisture and great flavor to the cake. I recommend using soy milk for the best outcome, however you can swap with another thick nondairy milk, if necessary.
Vegan sour cream: This helps make this cake extra moist and fudgy. If necessary, swap for non-dairy plain yogurt – however, it won’t be as rich.
Vegetable oil: This adds richness and moisture to the cake. You can use any kind of vegetable oil but if you’d like to substitute for melted coconut oil, I recommend using refined, as this will not add a coconut flavor.
Vanilla extract: This adds a delicious rich flavor to the cake. You should use pure vanilla extract for the best flavor.
Warm water or coffee: You’ll add this in at the end. It helps create a silky smooth batter and breaks up any remaining cocoa powder chunks. Using coffee intensifies the chocolate flavor without actually adding a coffee flavor to the cake, however, you can use water if you don’t have coffee. Be sure the liquid you use is warm.
Tools and Accessories Used
Kitchenaid Mixer: While not necessary, I love using my Kitchenaid mixer when making cakes. It helps make smooth batter and fluffy buttercream.
Rubber Scraper: You’ll need one of these to scrape the sides of the bowl. I also like use it to stir my buttercream by hand a bit to remove air bubbles before using.
8″ Round Cake Pans: You’ll need two of these to bake your layers.
Parchment Rounds: I line my cake pans with parchment rounds and spray them with nonstick spray so that the cake layers easily come out of the pans.
Kitchen Scale: While not necessary, it’s helpful to use a kitchen scale to divide your cake batter evenly between pans. You can also weigh your ingredients.
Cake Board: I recommend frosting your cake on top of a 9″ cake board for easy transfer and easy cleanup.
Offset Spatula: You’ll use this to spread the frosting.
Cake Scraper: Use this to create perfectly smooth edges.
Rotating Cake Stand: You’ll want to continuously turn the cake while frosting it to ensure smooth sides.
Piping Bag and Wilton 2D Tip: These are necessary to create the cute swirls around the top of the cake.

How to make and frost this cake
- Make and cool the cake layers. In a medium mixing bowl, whisk together the soy milk with the vinegar or lemon juice (this is your vegan buttermilk). Set aside for at least 10 minutes. In a separate, large mixing bowl or the bowl of your stand mixer fitted with a paddle attachment, mix together the dry ingredients. Whisk the remaining wet ingredients into your buttermilk. Add the wet mixture to the dry and mix until just barely combined. Add the warm water or coffee to the mixture, and mix until just combined. Be careful not to overmix. Distribute your cake batter evenly between the pans (using a kitchen scale can help with this). Bake in the preheated oven for 28-32 minutes, until a toothpick inserted into the center comes out clean or with just crumbs. Allow the layers to cool completely and, if desired, wrap in plastic wrap and freeze before beginning to frost. I find that it’s easiest to frost cake layers when they are chilled.
- Make the ganache: Add the chopped chocolate to a heat resistant bowl and set aside. Add the milk to a separate heat resistant bowl and microwave until hot but not boiling (you can also do this in a small saucepan over medium heat). Pour the milk over the chocolate and let sit for about three minutes, then whisk until smooth and creamy. Set aside to cool to room temperature. Place in the fridge or freezer to speed up this process, if desired.
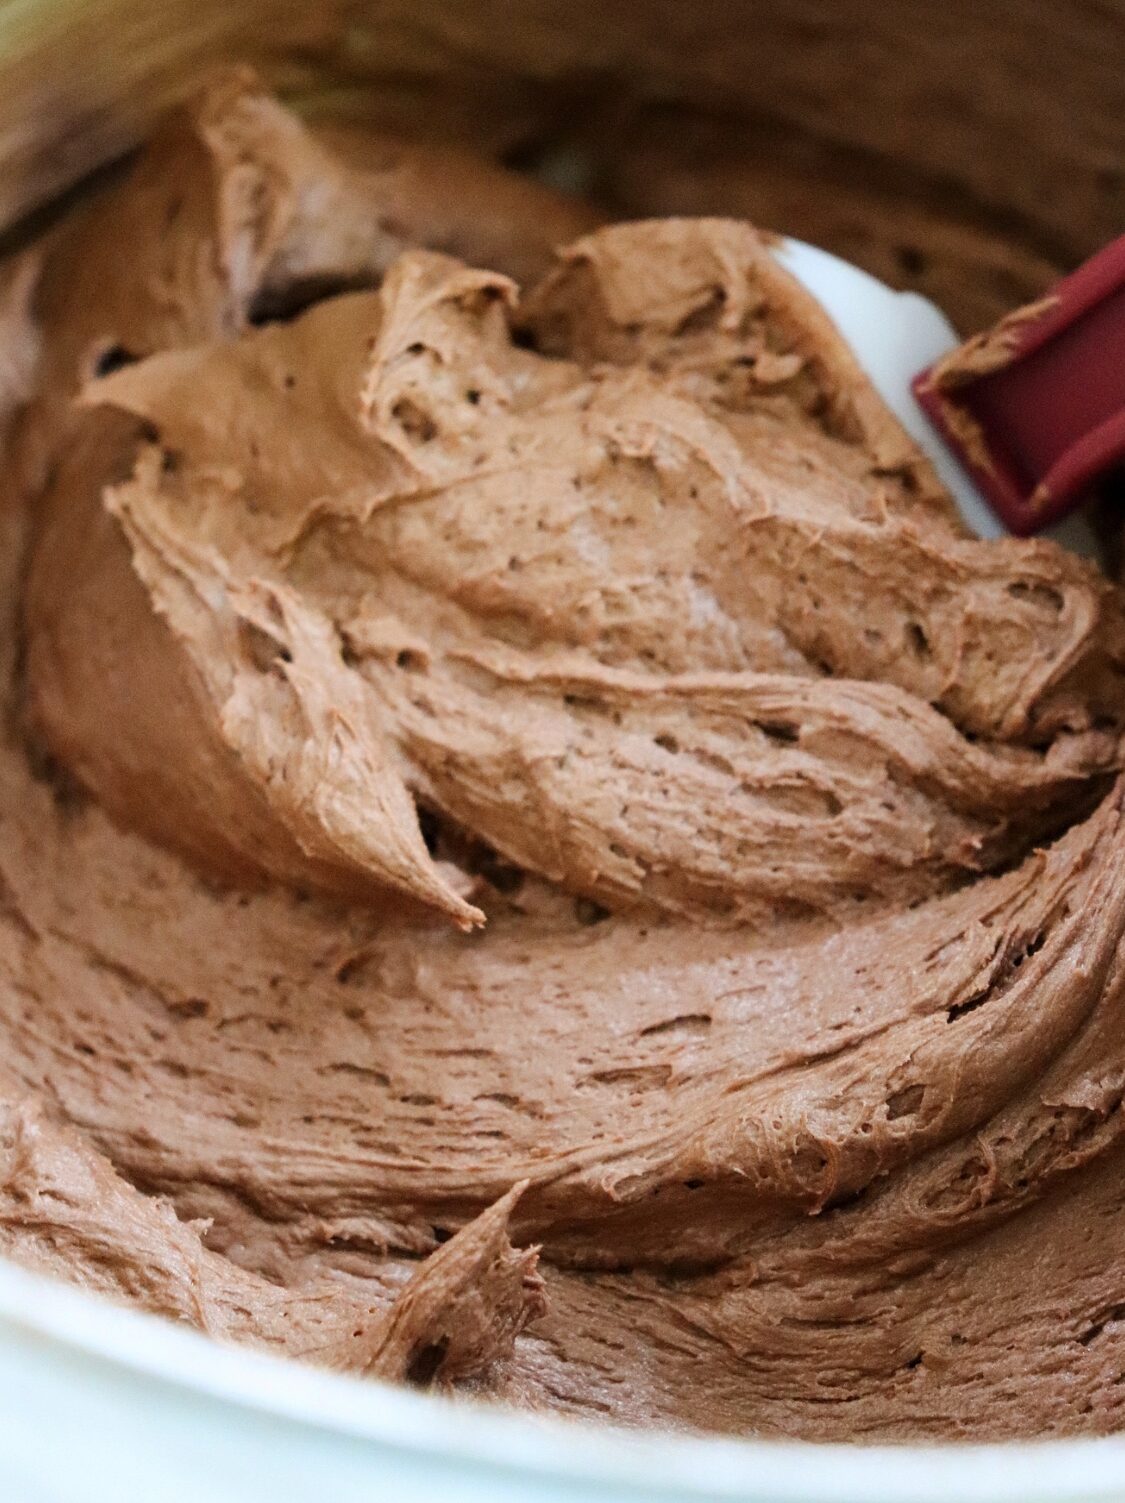
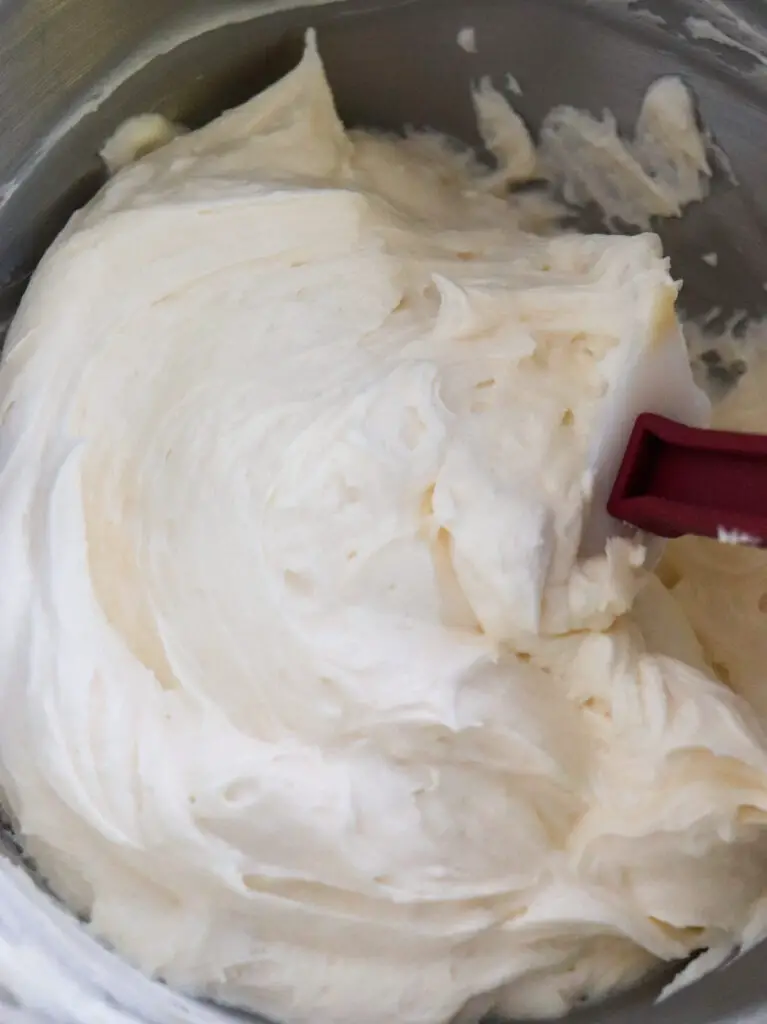
- Make the buttercream. Place the softened butter into a large mixing bowl or the bowl of a stand mixer fitted with a paddle attachment. Beat until light and fluffy. Add the powdered sugar, cocoa powder, and vanilla extract and beat again until combined. Add the cooled ganache to the mixture and beat again for a couple of minutes, scraping the sides as needed. If the buttercream is too thick, mix in more milk, ~1/2 tablespoon at a time, to get the desired consistency. If the buttercream is too thin, mix in more powdered sugar to thicken. To remove air bubbles, use a rubber scraper to stir the buttercream a bit and press it up against the sides of the bowl. I prefer to make buttercream right before I frost the cake so that the consistency stays perfect.
- Layer the cake. Place a cake round on top of a rotating cake stand. Spread a small amount of frosting in the center of the cake round. Place the first cake layer on top of the cake round. Spread a layer of frosting evenly overtop. Place the second cake layer (upside-down) on top of the first layer.
- Crumb coat. Using an icing spatula, spread a layer of frosting all over the outside of the cake. Use a bench scraper to remove any excess frosting. Freeze for 10-15 minutes.
- Frost. Using your icing spatula, spread a thick layer of frosting all around the cake. Use a bench scraper to smooth out the sides and the top. Fill in any remaining gaps in the buttercream with extra frosting, then scrape again around the sides. Finish by scraping the top, starting near the edges and pulling the scraper in towards the center.
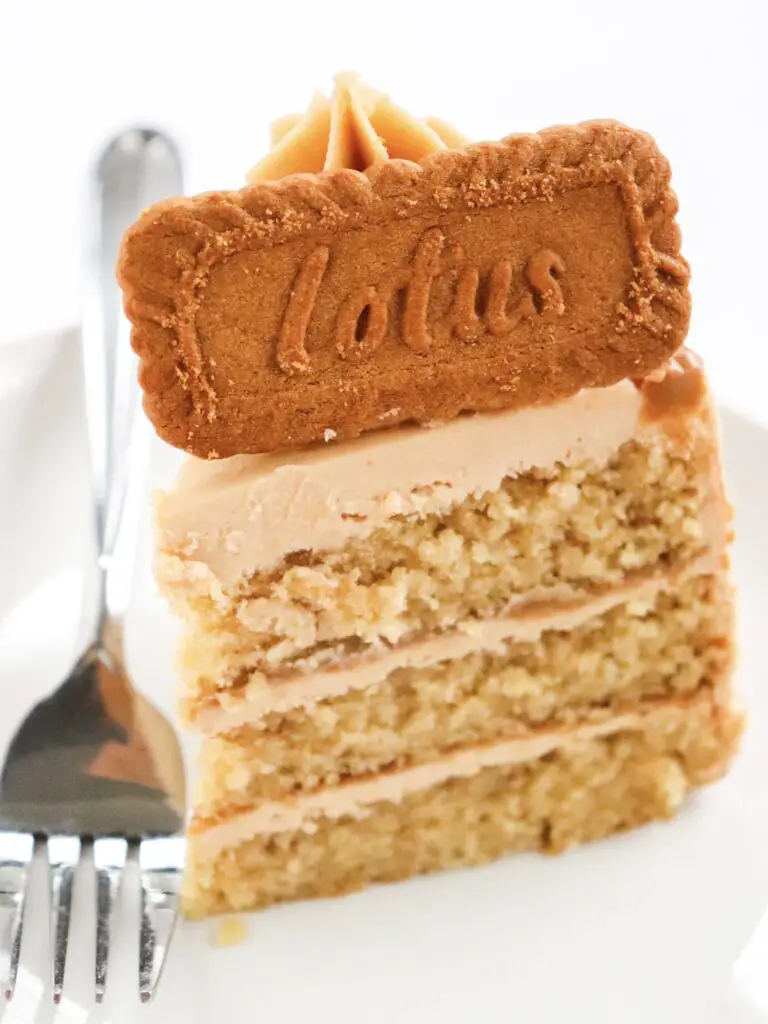
- Decorate. Press mini chocolate chips around the bottom of the cake. Place remaining buttercream into a piping bag with a Wilton 2D tip. Pipe twelve swirls around the edges of the cake (see video below or head to YouTube for a visual on how to frost and decorate).
- Enjoy! Slice and serve. This creates twelve large slices, however it can easily serve more.
Frosting options for this cake
This cake is coated in a chocolate ganache buttercream. However, if you want the look of a classic white cake, check out my vanilla buttercream recipe. It would also be delicious paired with my Biscoff cookie butter buttercream.
Tips and tricks
Measure your flour and cocoa powder correctly: Use the spoon-and-level method or weigh your flour and cocoa powder to ensure this cake doesn’t turn out dry.
Don’t overmix: For the best results, you should mix the dry and wet ingredients together until they are just combined. If you overmix, it can result in an overly dense and chewy cake.
Don’t overbake: The cake is done if a toothpick entered into the center comes out with no raw batter. It’s okay if there are some crumbs on the toothpick.
Softened butter: You’ll want the butter to be softened when making the buttercream. I recommend bringing it out of the fridge about 30 minutes to one hour before using.
Cool the layers completely: Prior to frosting, cool the cake layers completely. Don’t skip this step or you’ll have melty buttercream and maybe even broken layers. You may want to freeze them for at least 30 minutes or make them in advance to make them easier to frost.

Turning this recipe into cupcakes
You can use this recipe to make cupcakes, as well.
- Make the cake batter as described in the recipe below.
- Line two muffin tins with cupcake liners. Use a 3 tablespoon scooper to evenly distribute batter into the cavities.
- Bake for 16-20 minutes, until a toothpick inserted into the center comes out clean or with just crumbs. Allow to cool completely.
- To frost, place the frosting in a piping bag with a Wilton 2D tip. Pipe flower-like swirls on each cupcake.
- Top each with some mini chocolate chips.
Let me know your thoughts!
If you love this recipe or have any questions, leave me a comment with a rating below. I also love to see your creations on Instagram, so make sure to tag me @marykatesvegancakes so I can see and repost!
The Ultimate Fudgy Vegan Chocolate Cake
Ingredients
Fudgy Chocolate Cake
- 1 cup (240mL) soy milk*
- 1 tablespoon (15mL) apple cider vinegar, white vinegar, or lemon juice
- 2 cups (250g) all-purpose flour*
- ½ cup (50g) unsweetened natural cocoa powder
- 1 ½ cups (300g) granulated sugar
- 1 teaspoon baking soda
- 1 teaspoon baking powder
- 1 teaspoon salt
- 1 teaspoon espresso powder optional
- 1/2 cup (120g) vegetable oil
- 1/2 cup (120g) vegan sour cream*
- 1 tablespoon (15mL) vanilla extract
- 1/2 cup (120mL) warm water or warm coffee
Chocolate Ganache
- 1 (4oz) bar (113g / approximately 3/4 cup chopped) non-dairy chocolate*
- 1/2 cup (120mL) non-dairy milk*
Fudgy Chocolate Buttercream
- 1 cup (2 sticks / 227g) vegan butter*, softened*
- 4 cups (480g) powdered sugar
- ½ cup (50g) unsweetened cocoa powder
- ½ tablespoon (8mL) vanilla extract
- Extra non-dairy milk or powdered sugar, as necessary
Decoration
- Non-dairy mini chocolate chips
Instructions
- Make the cake layers: Preheat the oven to 350°F. Prepare two 8" round pans with parchment paper on the bottoms and non-stick spray around the sides.
- In a medium mixing bowl, whisk together the soy milk with the vinegar or lemon juice (this is your vegan buttermilk). Set aside for at least 10 minutes. In a separate, large mixing bowl or the bowl of your stand mixer fitted with a paddle attachment, add the flour, cocoa powder, sugar, baking soda, baking powder, salt, and espresso powder. Mix until combined. To your buttermilk, add the vegetable oil, sour cream, and vanilla. Whisk to combine. Add the wet mixture to the dry and mix until just barely combined. Add the warm water or coffee to the mixture, and mix until just combined. Do not overmix. Scrape the sides as necessary.
- Distribute your cake batter evenly between the pans (using a kitchen scale can help with this). Bake in the preheated oven for 28-32 minutes, until a toothpick inserted into the center comes out clean or with just crumbs. Allow the layers to cool completely and, if desired, wrap in plastic wrap and freeze before beginning to frost.
- Make the ganache: Add the chopped chocolate to a heat-proof bowl and set aside. Add the milk to a separate heat-proof bowl and microwave until hot but not boiling. You can also do this in a small saucepan. Pour the milk over the chocolate and let sit for about three minutes, then whisk until smooth and creamy. Set aside to cool to room temperature. Place in the fridge or freezer to speed up this process, if desired.
- Make the buttercream: Place the softened butter into a large mixing bowl or the bowl of a stand mixer fitted with a paddle attachment. Beat until light and fluffy. Add the powdered sugar, cocoa powder, and vanilla extract and beat again until combined. Add the cooled ganache to the mixture and beat again for a couple of minutes, scraping the sides as needed. If the consistency is too thick, mix in more milk, ~1/2 tablespoon at a time, to get the desired consistency. If the consistency is too thin, mix in more powdered sugar to thicken. To remove air bubbles, use a rubber scraper to stir the buttercream a bit and press it up against the sides of the bowl.
- Frost and decorate the cake: Place a cardboard cake board on top of a rotating cake stand. Spread a small amount of frosting in the center of the cake board. Place the first cake layer on top of the cake board. Spread a layer of frosting evenly over the cake layer. Place the second cake layer, upside down, on top. Spread a thin layer of frosting all over the cake (this is your crumb coat). Freeze for at least fifteen minutes.
- Using your offset spatula, spread a thick layer of frosting all over the cake. Use a bench scraper to smooth out the sides and the top. Press mini chocolate chips around the bottom of the cake. Place any remaining frosting into a piping bag with a Wilton 2D tip. Pipe 12 swirls around the top of the cake. See the video above or head to YouTube for a detailed visual of frosting and decorating this cake.
- Serve: Serve this cake the same day as frosting it, or place in the fridge until serving. Store any remaining cake in an airtight container in the fridge or freezer.
Notes
- Soy Milk: I recommend soy milk for the best consistency. You can use another non-dairy milk, however it may not curdle as well.
- Measuring Flour: Use the spoon-and-level method or weigh your flour to ensure your cake doesn’t turn out dry.
- Sour Cream: You can substitute non-dairy yogurt for the sour cream, however the cake won’t be as rich.
- Vegan Butter: I recommend using vegan buttery sticks for the buttercream rather than margarine from the tub.
- Softened Butter: You should allow your butter to soften to room temperature (bring out of the fridge about 30 minutes to 1 hour prior) before using.
- Chocolate: You should use a high quality chocolate bar for the best outcome, but you can substitute for chocolate chips if desired.
- Non-dairy Milk: I recommend using soy or oat milk because of their flavor and thickness, but you can use your favorite non-dairy milk.
Can we use chocolate instead of coco powder?
You should stick to using cocoa powder in this recipe!
Hi this cake sounds and looks amazing! However I need to make it gluten free would you be able to advise how? Many thanks
Best chocolate cake. Easy to make. Very decident.